

Table management
A table group is an area or floor of one location, for example “Patio” or “Pedicure Stations”. A table group holds tables or stations. Staff pick a table in the POS app when they start a dine-in order. Each table has its own QR code.
How tables are organized
Section titled “How tables are organized”| Item | What it is |
|---|---|
| Table group | An area or floor. It belongs to one location and can be turned off. |
| Table | One table or station in a group, with a name, a number of seats and a status. |
| Layout | An optional floor plan. You place each table of a group on a floor and choose its shape and size. |
Add a table group
Section titled “Add a table group”Open Table management
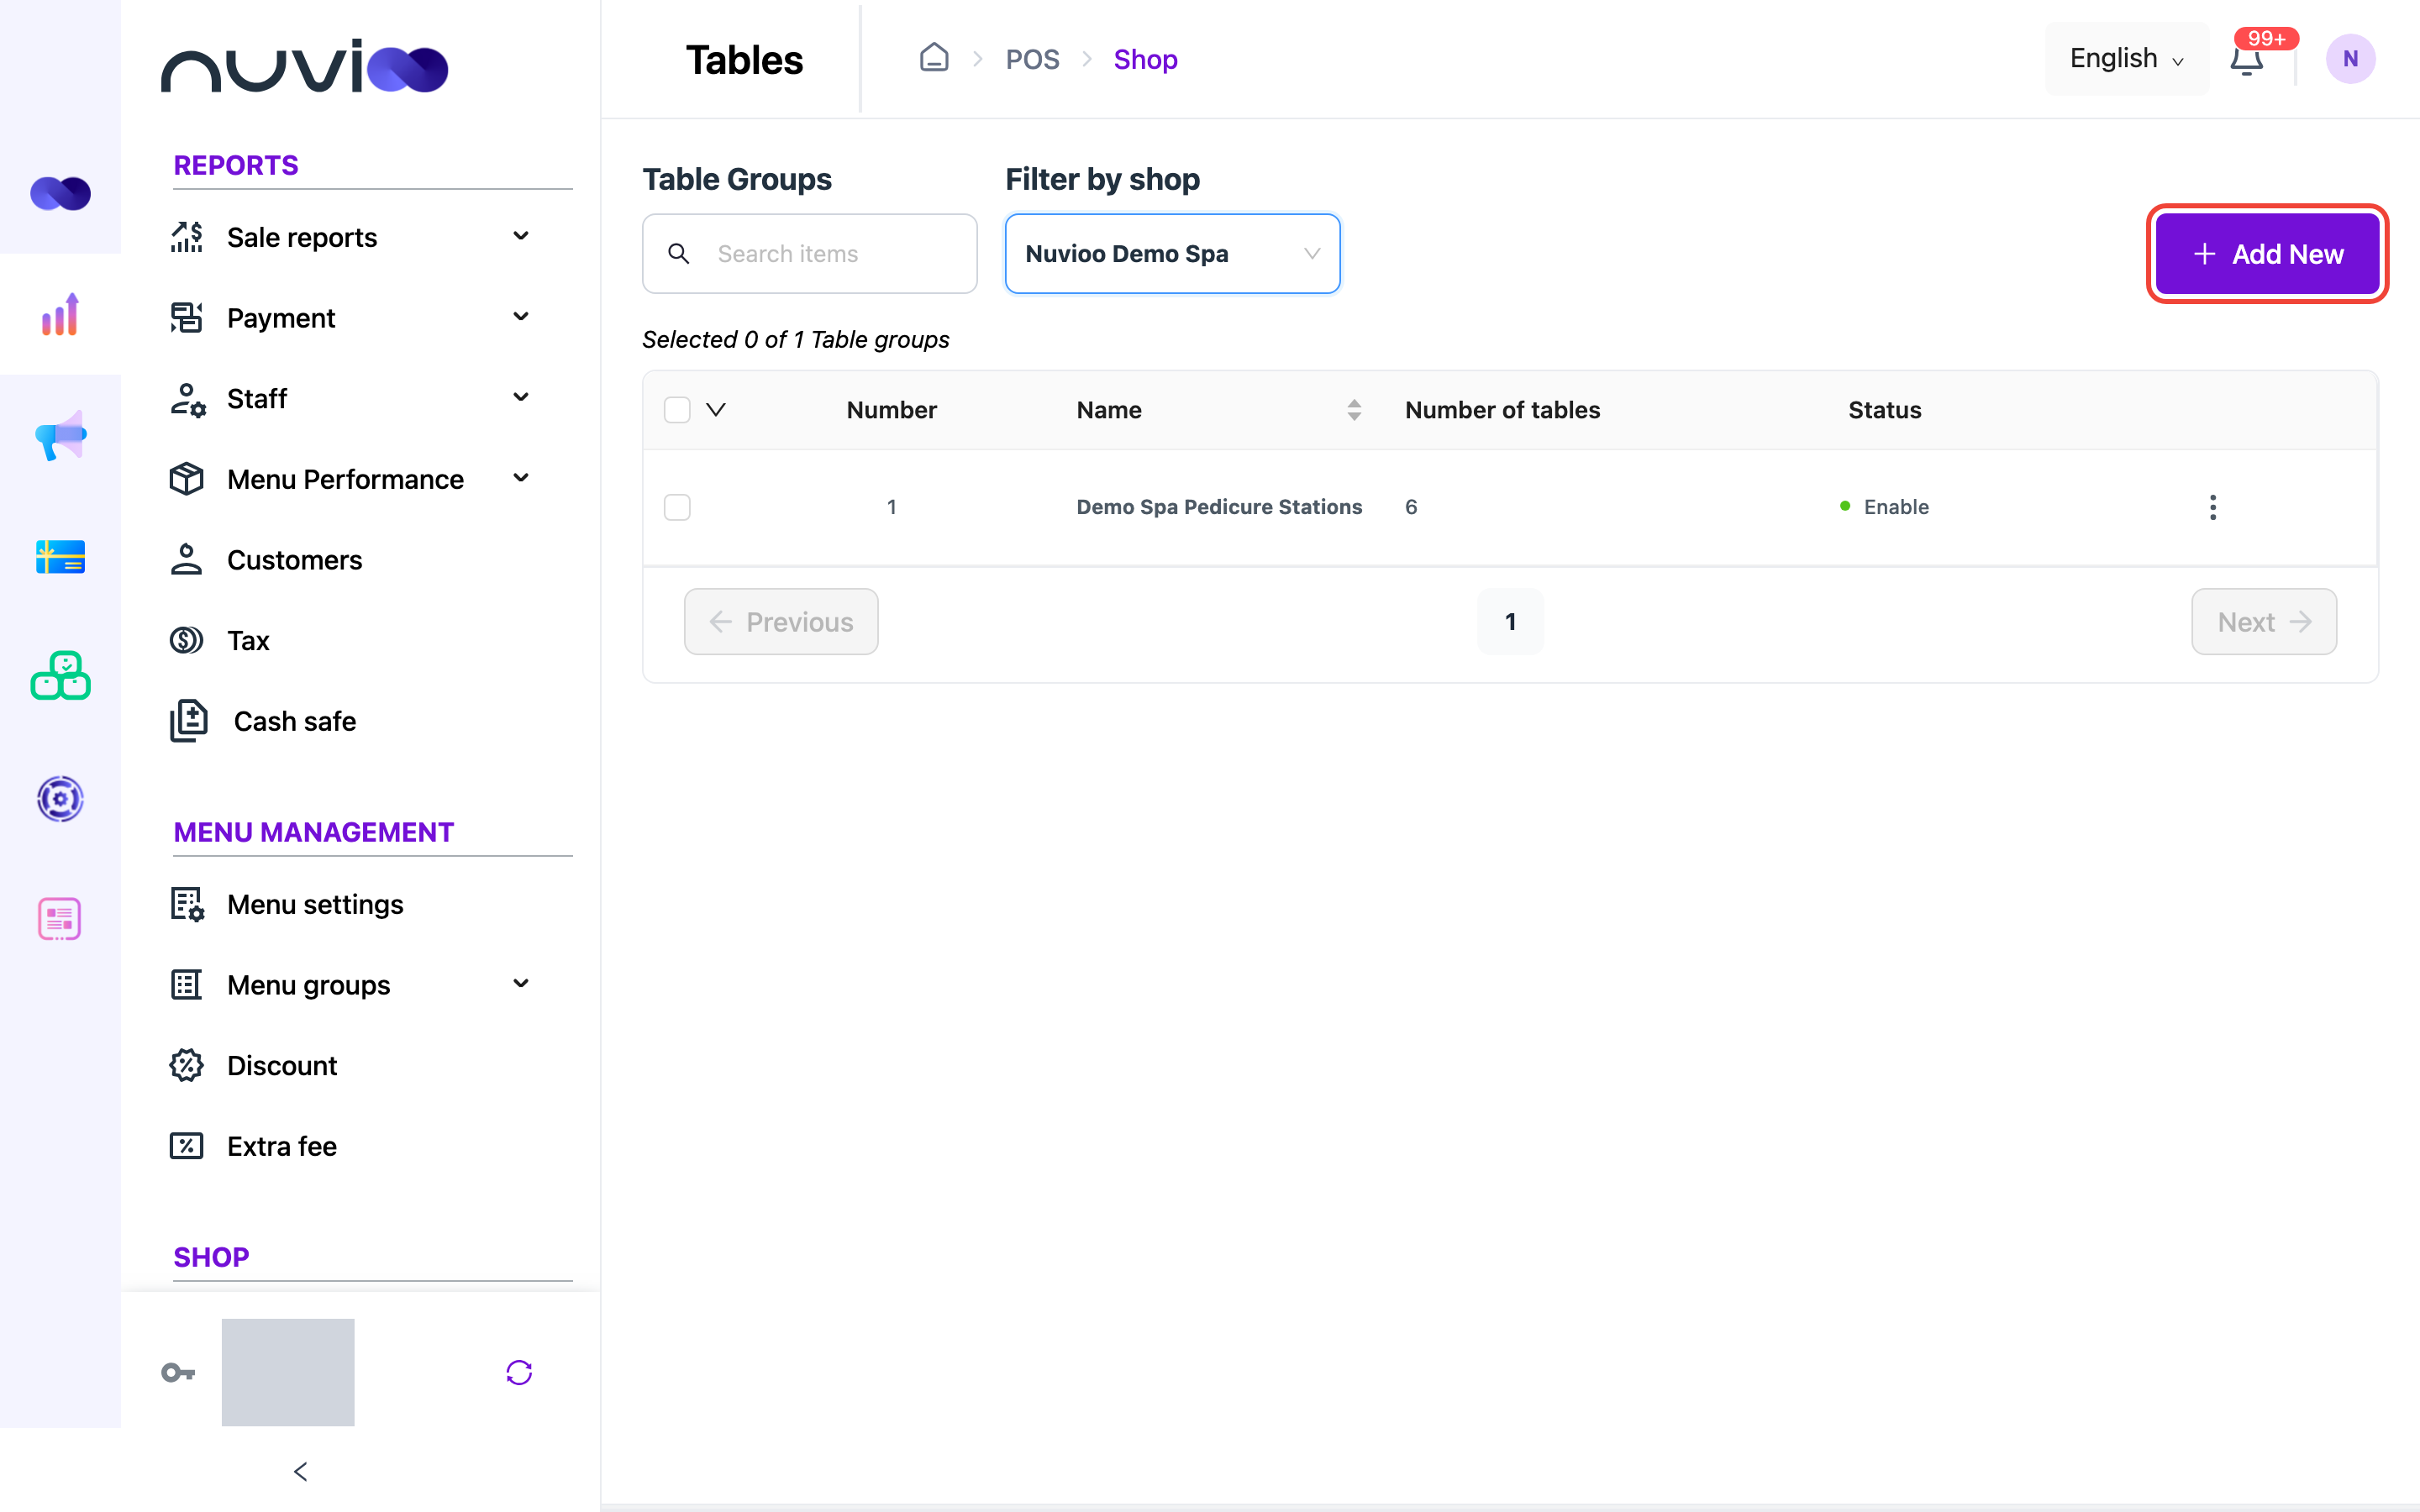
In the sidebar, under Shop, click Table management. The page lists Table Groups. Choose the location in Filter by shop, then click Add New.
Enter the group details
Fill in the fields in the group field table below.
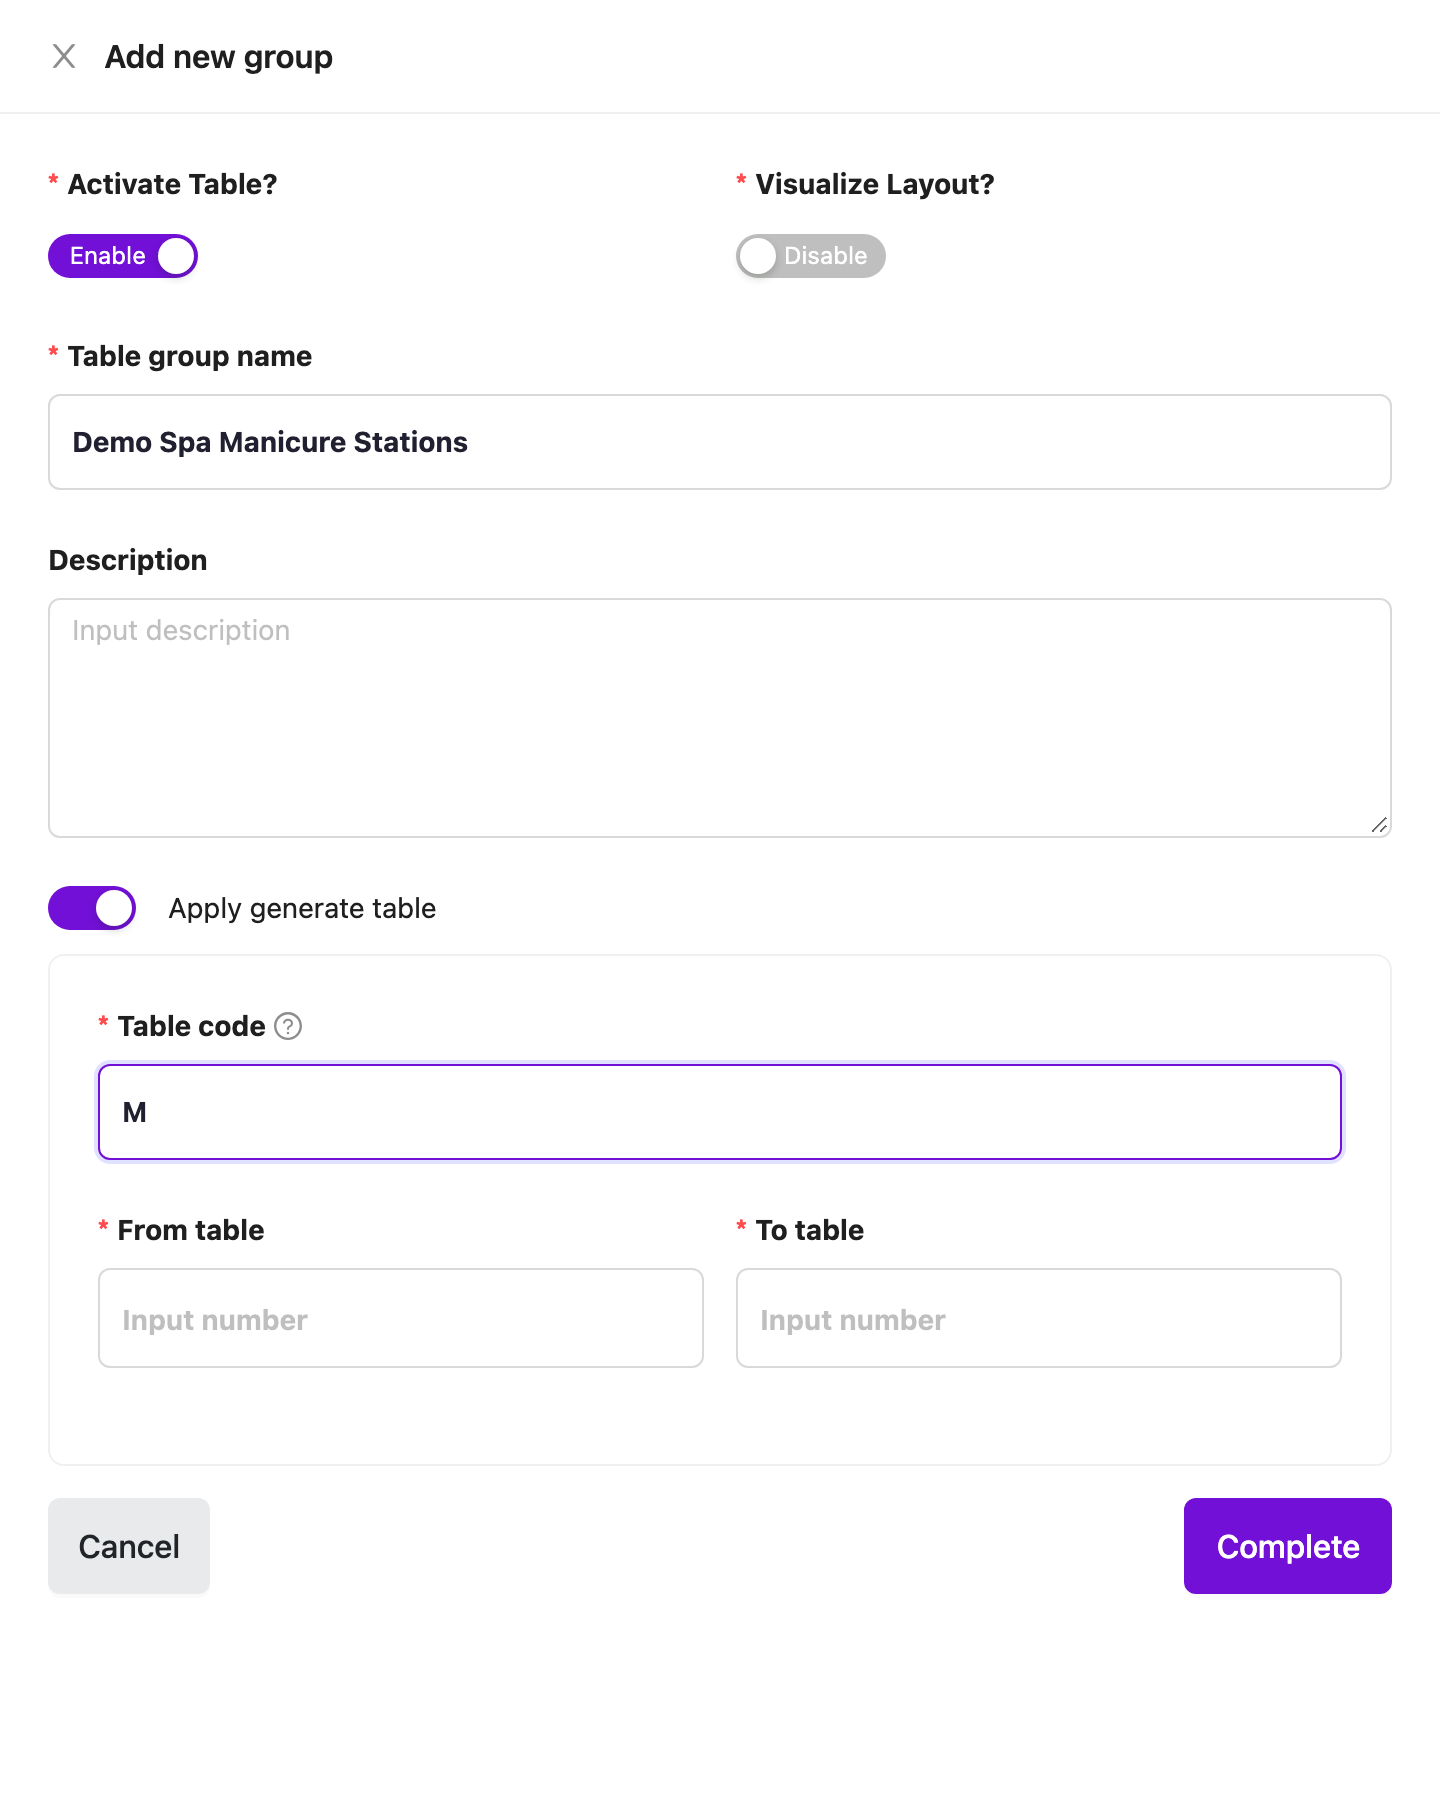
Add new group Save
Click Complete.
Table group fields
Section titled “Table group fields”| Field | Required | What it does |
|---|---|---|
| Activate Table? | Yes | A switch, Enable by default. Turn it off to hide the group from the POS app. |
| Visualize Layout? | Yes | A switch, Disable by default. Turn it on to show this group as a floor plan in the POS app. See Floor layout. |
| Table group name | Yes | The group name, up to 200 characters. |
| Description | No | Notes, up to 500 characters. It shows in brackets under the name in the list. |
| Apply generate table | No | A switch. Turn it on to create tables automatically. |
| Table code | Yes, when generating | The prefix for the table names. Hover over the hint to see examples. |
| From table and To table | Yes, when generating | The first and last table number. Both must be whole numbers, From table must be at least 1 and To table must be larger than From table. |
Generate tables
Section titled “Generate tables”With Apply generate table on, Nuvioo creates one table for each number from From table to To table. It adds the number to the Table code with at least two digits.
- Code
M, from 1 to 3, creates M01, M02 and M03. - Code
VIP-, from 1 to 3, creates VIP-01, VIP-02 and VIP-03.
Each generated table is active and has 1 seat. Change the seats afterwards in the table list. If you edit the group and change the range, Nuvioo adds only the table names that don’t exist yet. It never deletes or renames tables.
The table group list
Section titled “The table group list”| Column | What it shows |
|---|---|
| Name | The group name, with the description below it. Click the column title to sort. |
| Number of tables | How many tables the group has. |
| Status | Enable or Disable. |
Type in the search box to find a group by name. The header shows Selected 0 of N Table groups.
To change several groups at once, tick their boxes and click the arrow in the header. Choose Enable, Disable or Delete.
Manage tables in a group
Section titled “Manage tables in a group”Click ⋮ on a group to open its menu.
| Menu item | What it does |
|---|---|
| Add new table | Adds one table to the group. See Table fields. |
| View table list | Shows the group’s tables with their QR codes and seats. |
| Visualize layout | Opens the floor layout editor. It appears only if your plan includes table layout. |
| Edit | Opens the group form. |
| Delete | Deletes the group. A group can only be deleted when it has no tables. |
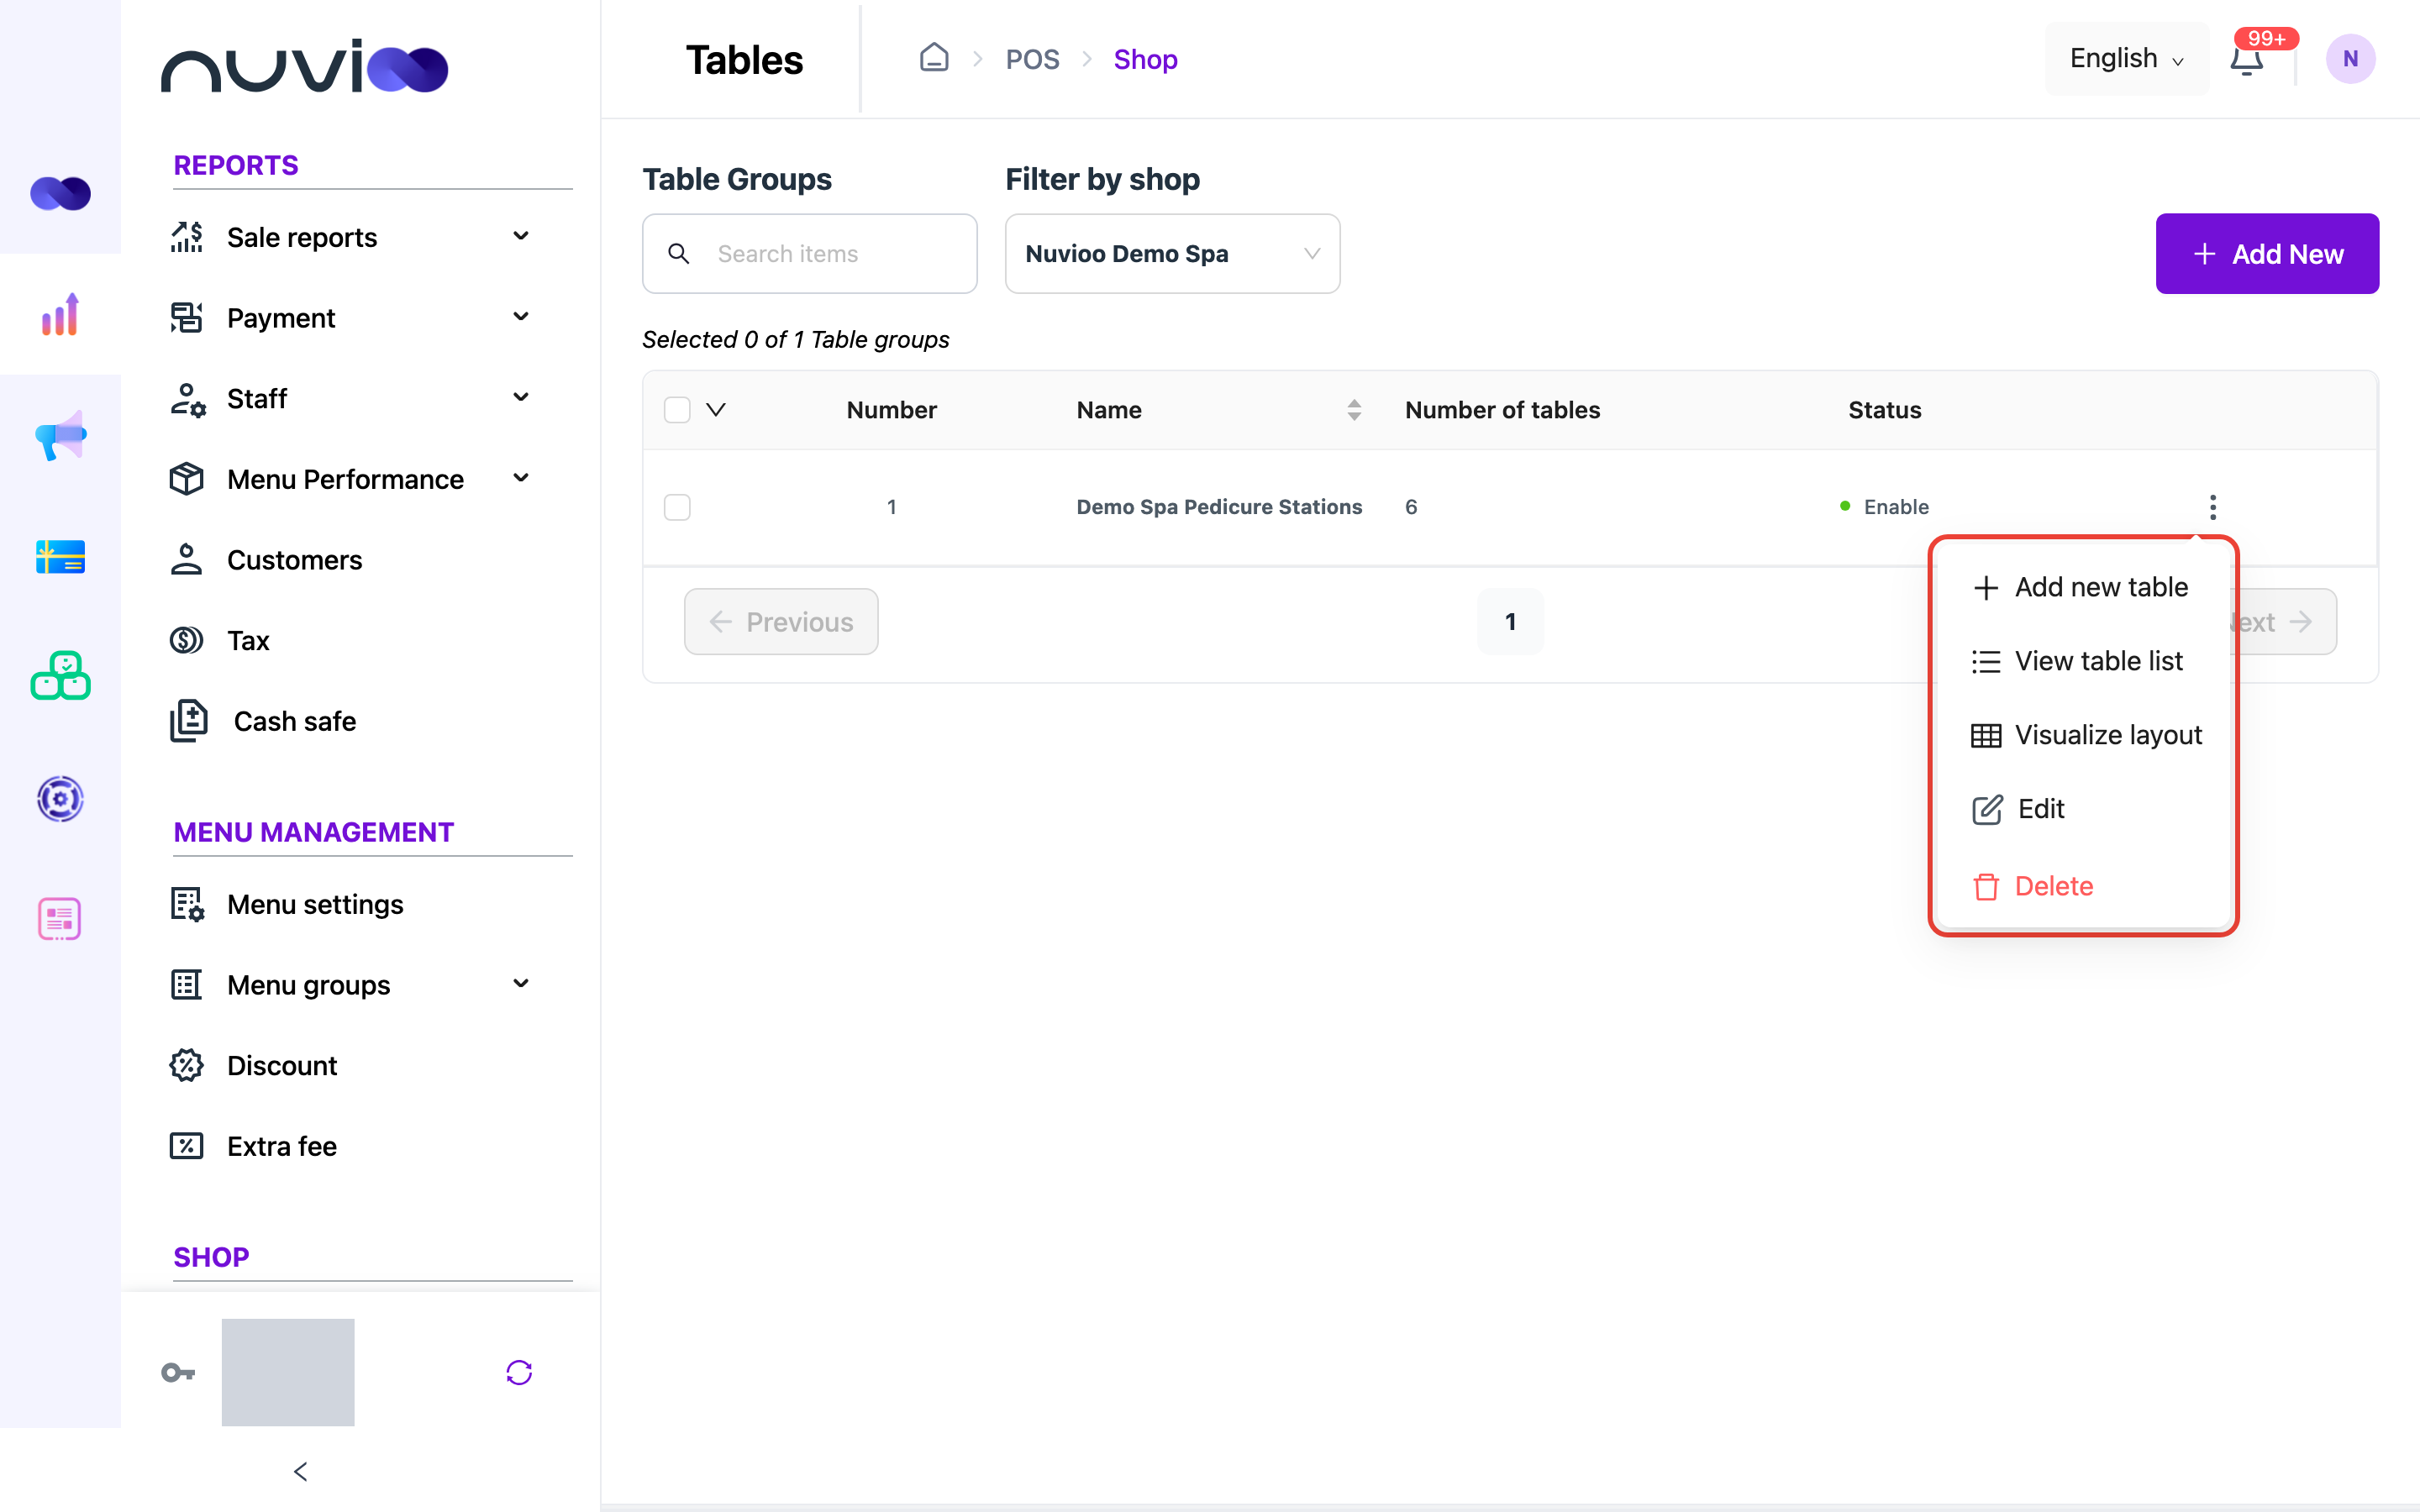
Menu items show only for the actions your role is allowed to do.
Table fields
Section titled “Table fields”| Field | Required | What it does |
|---|---|---|
| Activate Table? | Yes | A switch, Enable by default. Turn it off to hide the table from the POS app. |
| Name | Yes | The table name, up to 200 characters. |
| Seats | Yes | The number of seats, as a whole number of 1 or more. |
The table list
Section titled “The table list”View table list shows the group’s tables. Use Back to table to return to the groups.
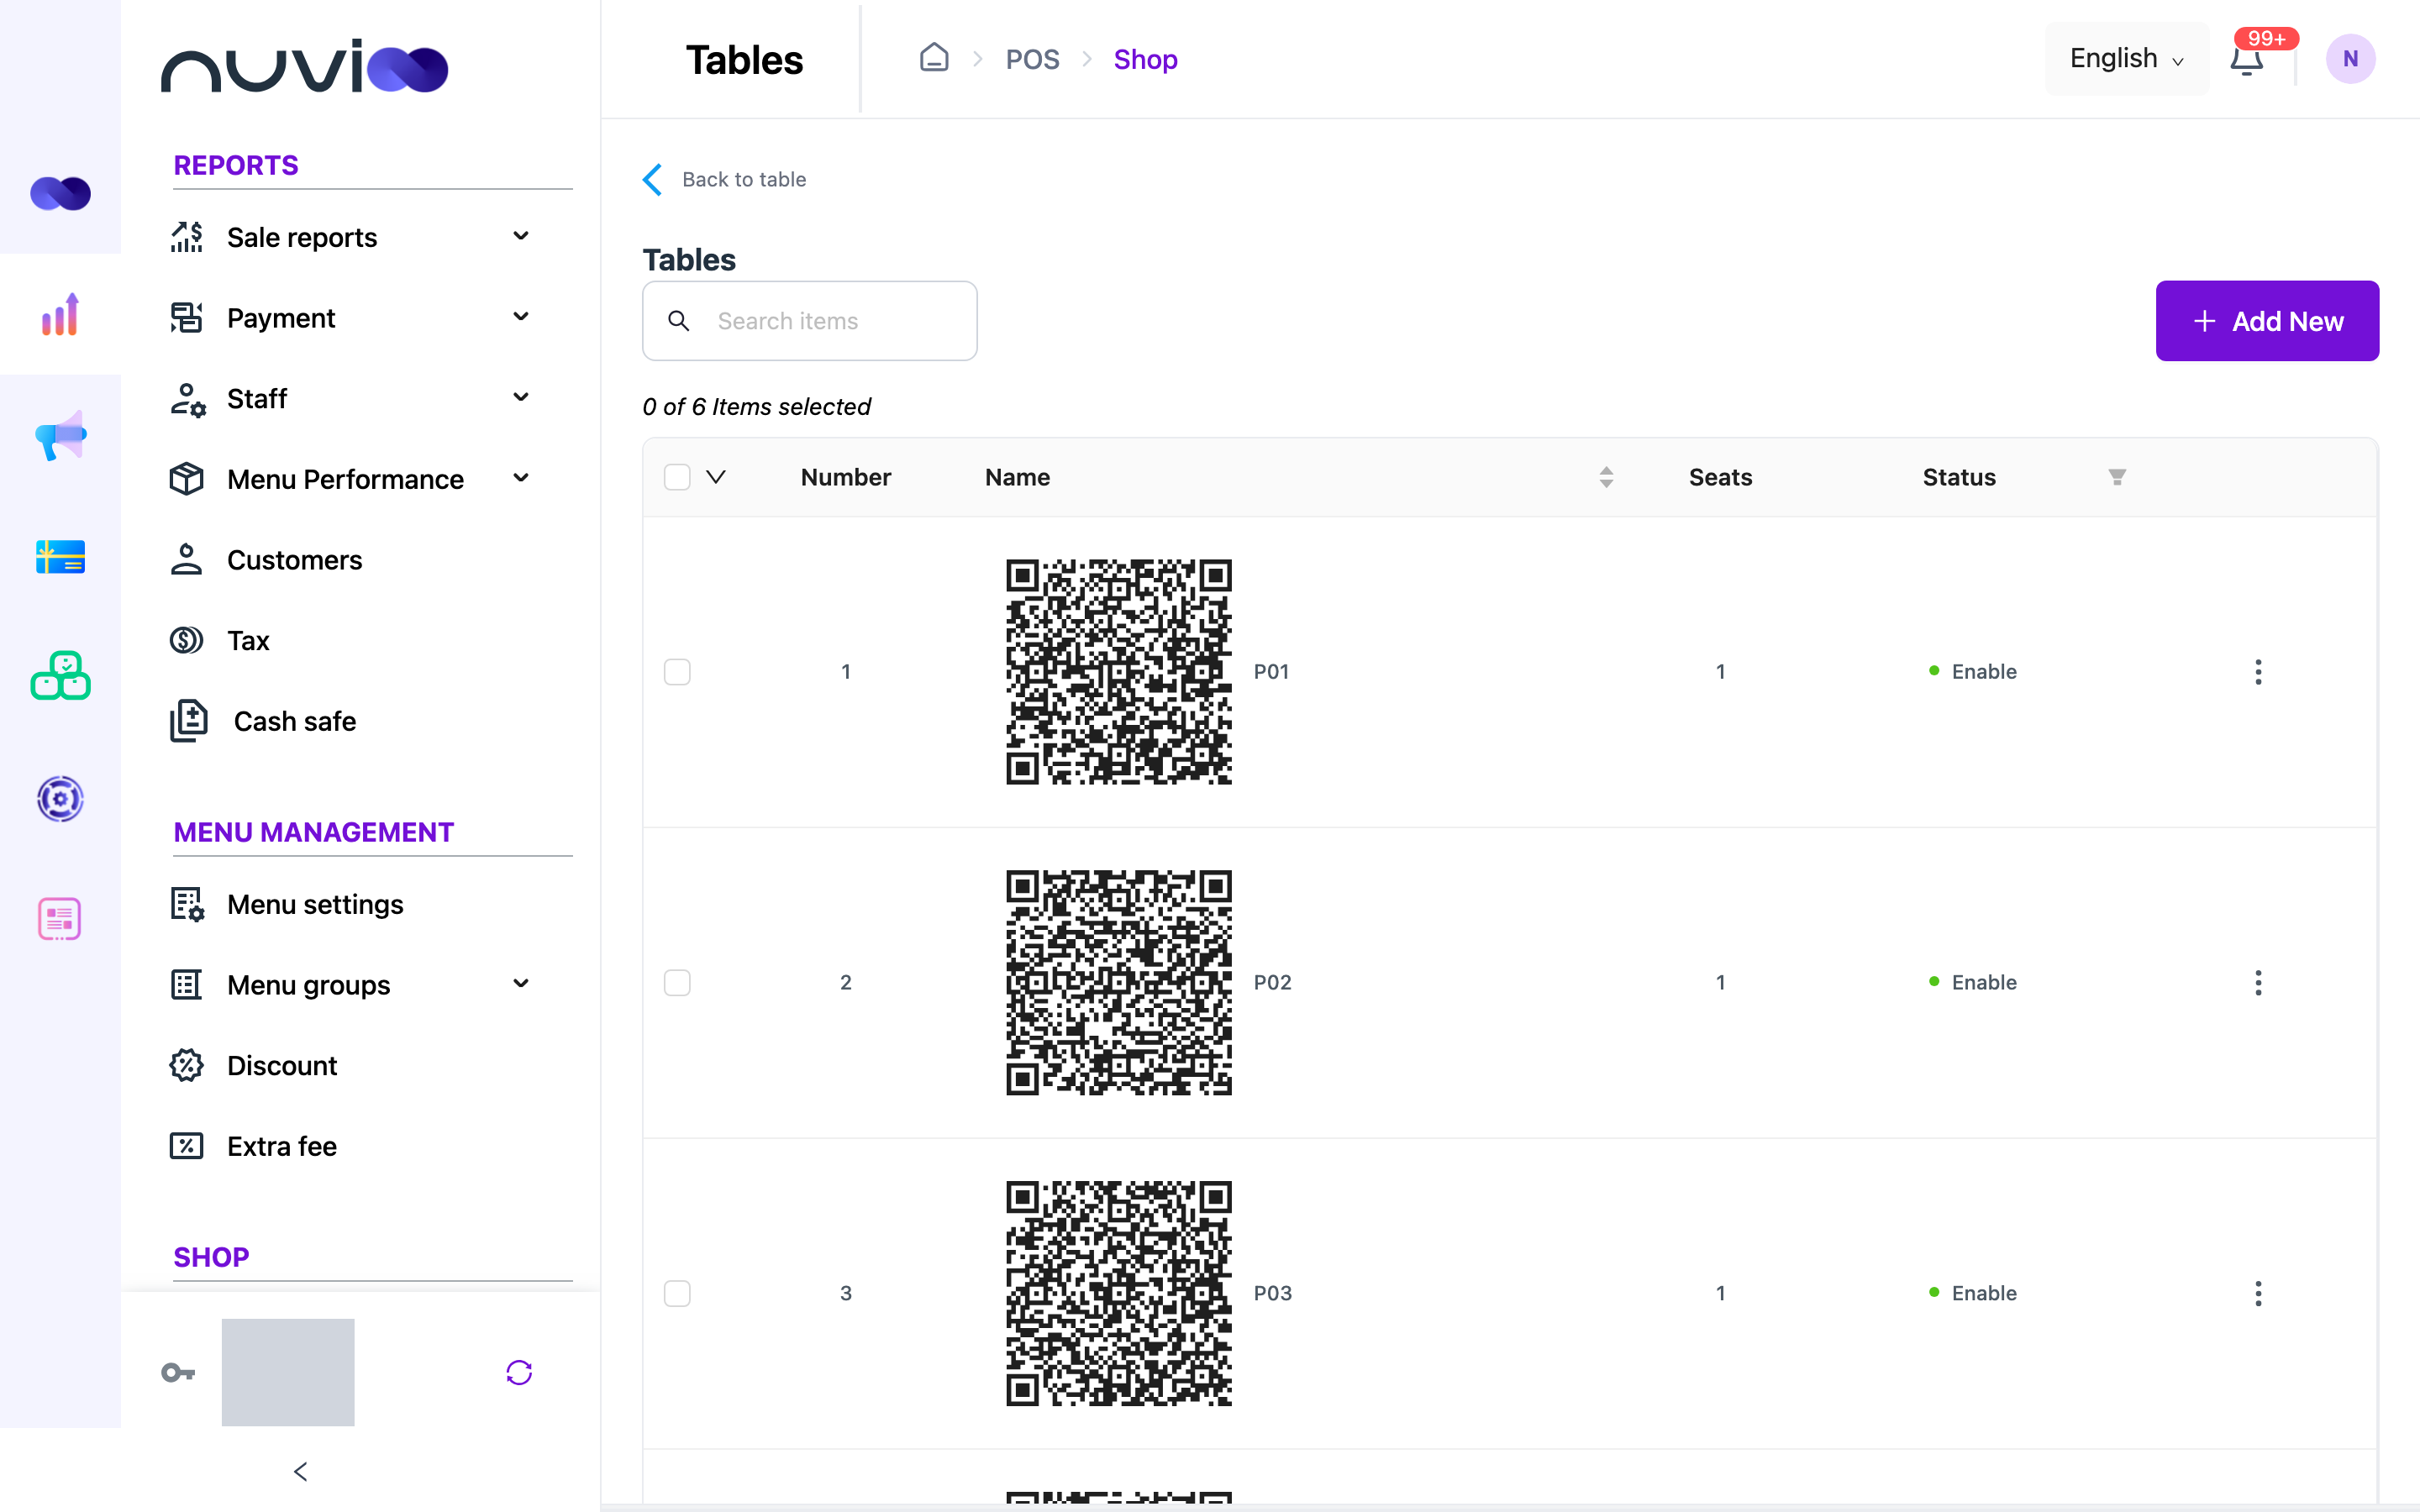
- Search by table name, sort by Name, and filter Status to Enable or Disable.
- Click Add New to add a table. Click ⋮ on a row to Edit or Delete it.
- Tick rows and use the header arrow to delete several tables.
Print a table QR code
Section titled “Print a table QR code”Click a table’s QR code in the list. Print QR Code shows the code with the table name and your logo from General settings. Click Print to print it, or Cancel to close.
The QR code links to your online ordering site with that table selected. See Online ordering.
Floor layout
Section titled “Floor layout”The layout editor lets you arrange a group’s tables on a floor plan. It needs a plan that includes table layout. Open it from ⋮ > Visualize layout. The right panel shows the group name as the floor.
Place tables on the floor
The right panel lists tables that are not on the floor yet, each with its name and seats in brackets, for example P01 (2). Click a table to place it on the floor. Click Add New in the panel to create a new table for this group.
Arrange them
Drag a table to move it. A table stays inside the floor. Drag its edge or corner handles to resize it.
Set shape and size
Click a table to select it. Click more tables to select several. The options bar shows Shape (square or circle), Width and Height. The new value applies to every selected table. Width and height count grid cells and must be at least 1.
Remove a table from the floor
Select the table and click the trash icon in the options bar. The table goes back to the panel list. It is not deleted.
Save
Click Save. Click Cancel to drop changes you haven’t saved. Both buttons are off until you change something.
Tables on the POS app
Section titled “Tables on the POS app”- Tables and groups. The POS app shows the tables of the location it is signed in to. Only groups and tables that are enabled show.
- Counts. The Table screen counts Free tables and Occupied tables.
- Done tables. When the location has Busboy on, the screen also counts Done tables and shows a Clear all button. Turn Busboy on or off in Locations.
- Floor plan or list. If your plan includes table layout and the group has Visualize Layout? on, the app shows the floor plan. It shows only tables you placed on the floor. Otherwise it shows a simple list of the group’s tables.
- Pay now. With Pay now on for the location, dine-in orders skip table selection.