

Settlements and disputes
If you take cards with Nuvioo payments, card sales are paid to your bank in settlements. When a customer asks their bank to reverse a payment, you see a dispute. In the sidebar, under Reports, open Payments and choose Settlements or Disputes.
The Filter by range and Filter by shop filters work as described in Common filters and export.
Settlements
Section titled “Settlements”Open Payments → Settlements. Each row is one settlement, which is one payout batch for your location.
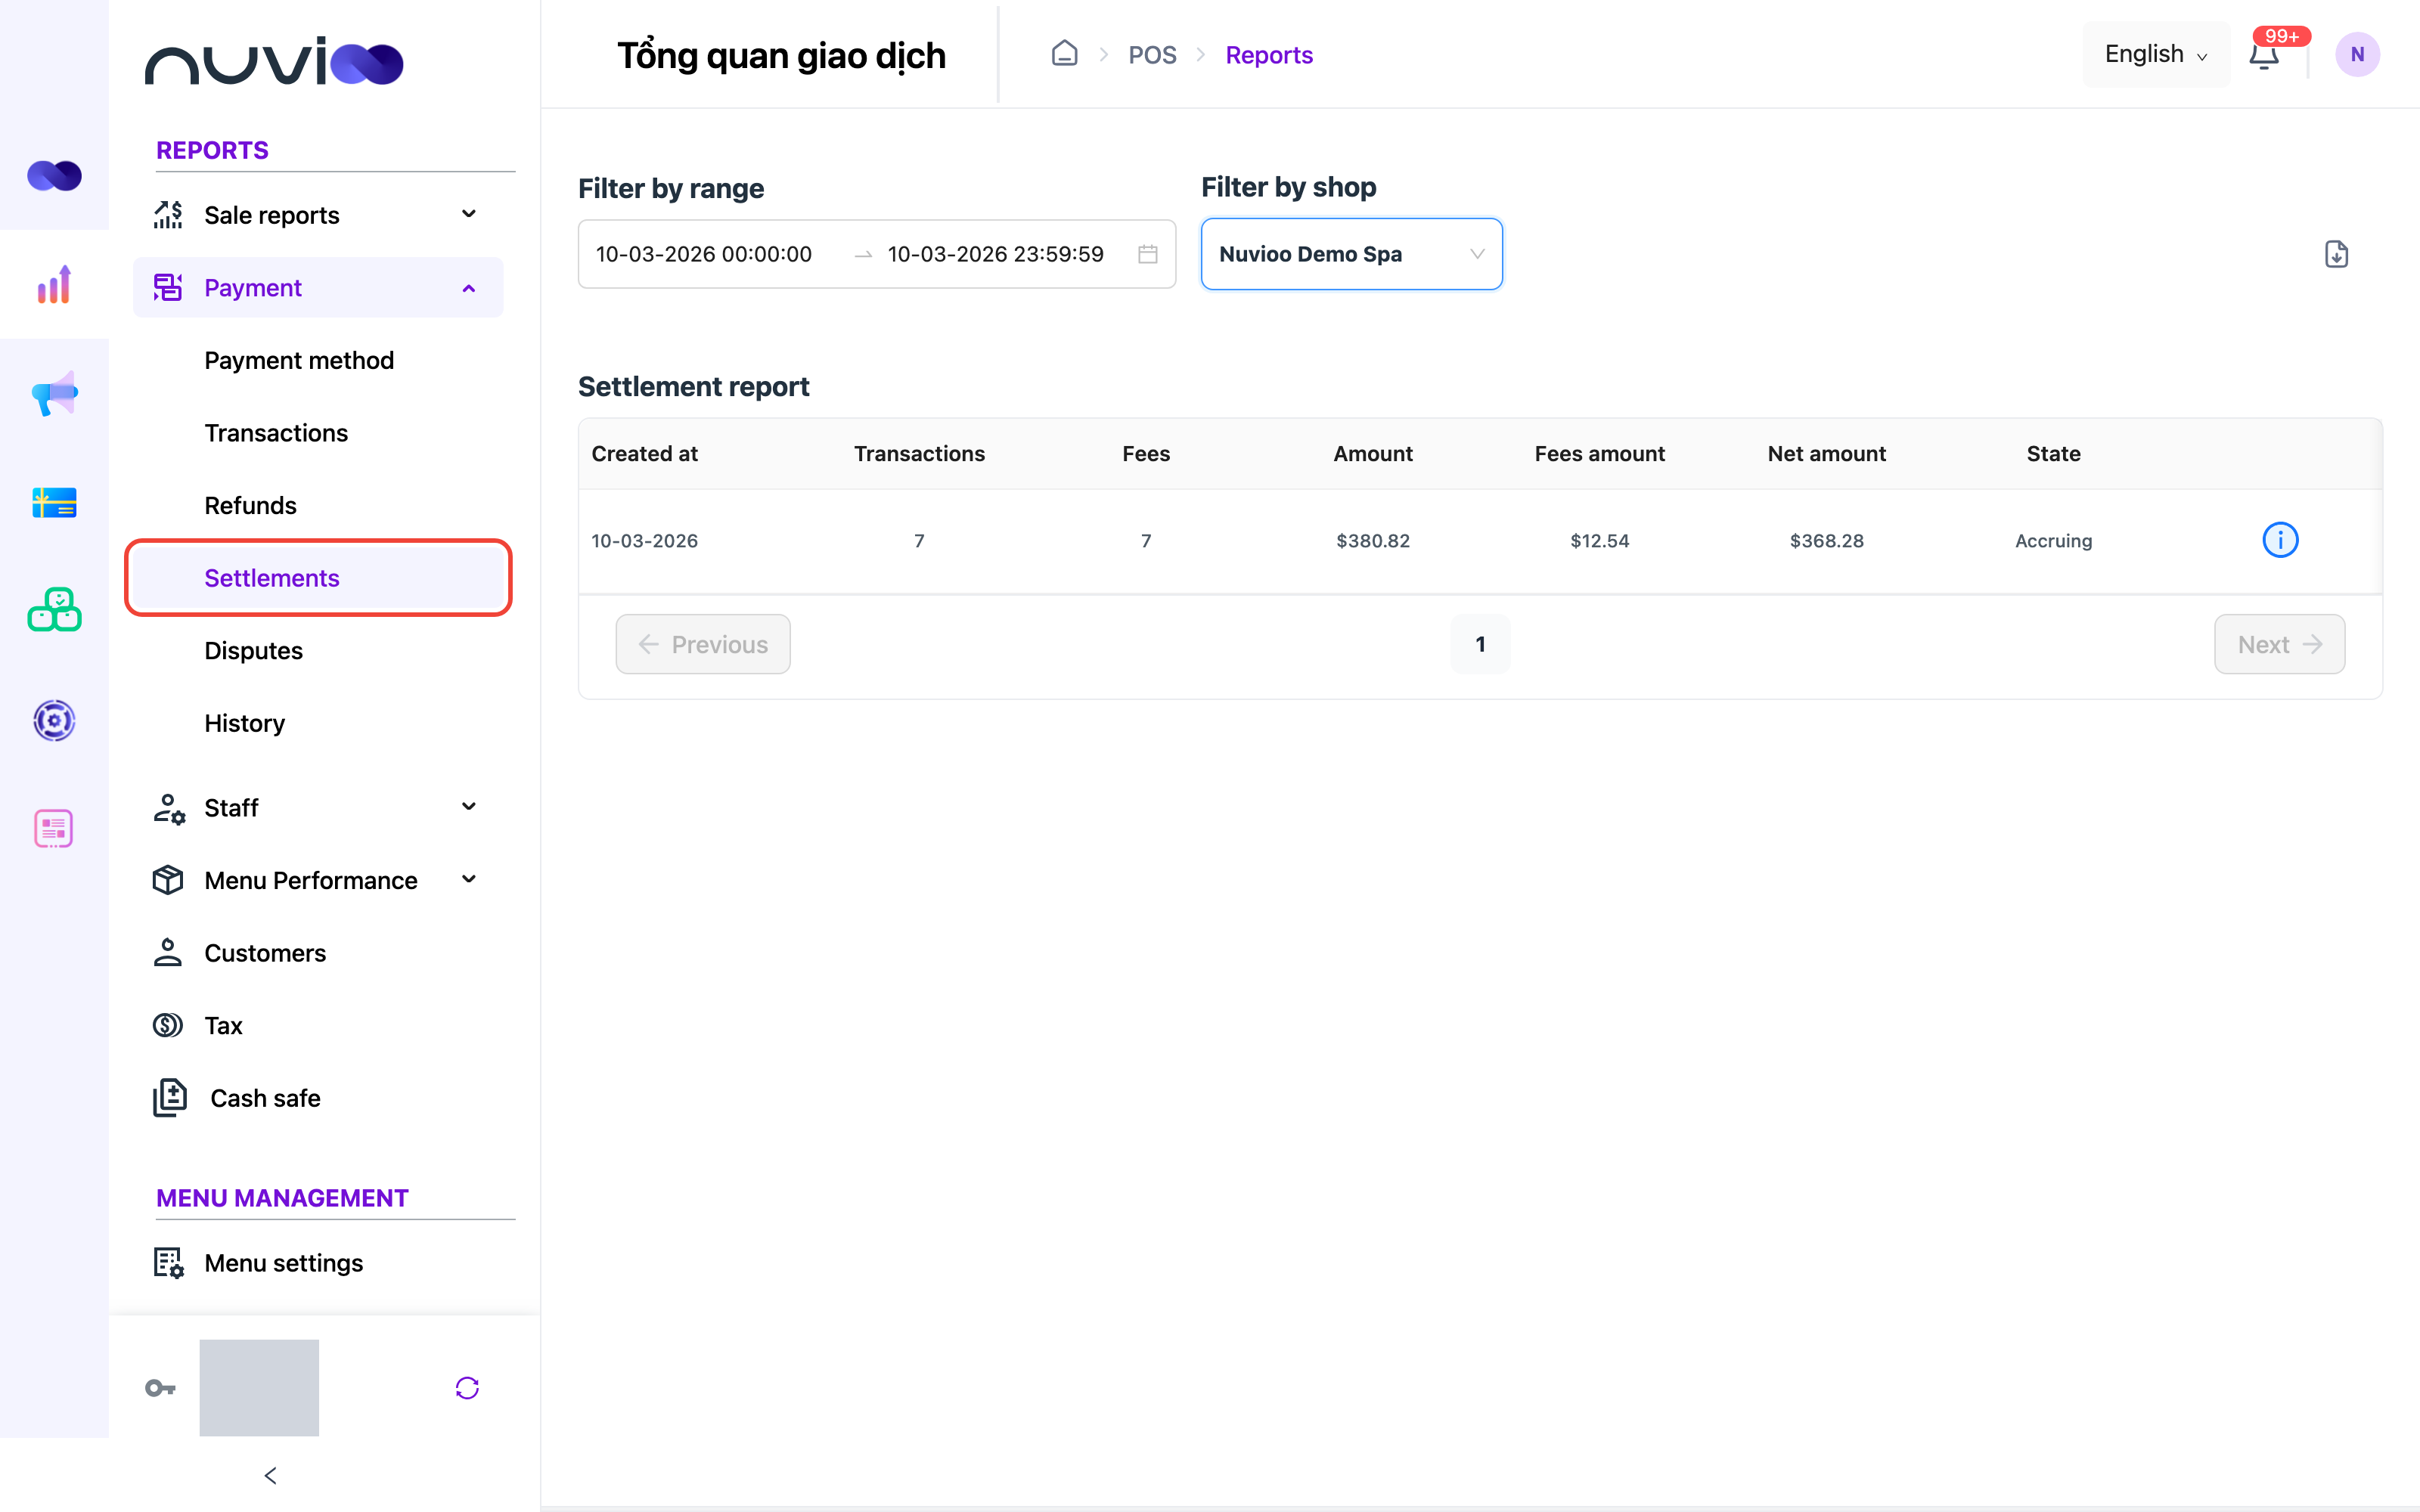
| Filter | Default | What it does |
|---|---|---|
| Filter by range | Today | Matches the date the settlement was created. Widen the range to see earlier settlements. |
| Filter by shop | See the link above. | Chooses the location. |
| Column | Definition |
|---|---|
| Created at | The date the settlement was created. |
| Transactions | The number of debit transfers, split transfer debits, reversals and dispute debits in the settlement. |
| Fees | The number of fees charged. It is a count, not an amount. |
| Amount | The settlement’s total amount. An amount of zero or less shows in brackets. |
| Fees amount | The total of the fees. |
| Net amount | Amount minus Fees amount. An amount of zero or less shows in brackets. |
| State | Where the settlement is in its life. See the table below. |
Newest settlements come first. Click the i button at the end of a row to open the settlement’s details.
The download button exports an Excel file. This screen has no print button.
Settlement states
Section titled “Settlement states”The processor sets the state. Nuvioo shows it as it receives it.
| State | What it means |
|---|---|
| Accruing | The settlement is still open and collecting transactions. |
| Awaiting approval | The settlement is waiting for approval. |
| Approved | The settlement was approved. Its funding transfers are listed in the details. |
A Succeeded or Canceled label can also appear, for example on a funding transfer.
Settlement details
Section titled “Settlement details”The i button opens a window with a summary at the top and two tabs.
| Summary item | Definition |
|---|---|
| Settlement and ID | The settlement’s ID. Hover over the ID tag and click Click to copy. The amount below it is the settlement’s total amount. |
| FEES AMOUNT | The total fees, shown in brackets. |
| NET AMOUNT | The total amount minus the fees. |
| STATE | The state, with a colored dot. |
| CREATED ON | The date and time the settlement was created. |
| PAYMENT SETTLEMENT SCHEDULE | How often settlements are made, for example Daily. |
| PAYOUT TYPE | The payout type set by the payout plan, for example Net. |
General Information tab:
| Section | What it shows |
|---|---|
| Details | Entry accrual start and Entry accrual end, the period of transactions the settlement collects. Auto close, the time the settlement closes on its own. Processor. |
| Overview | The Transactions group with Debits, Credits, Fees and Refunds. Each shows a count next to its name and an amount below. The last column is the Net amount. |
| Funding transfer | The transfers that move the money to your bank. It appears only when transfers exist. It lists up to 10 transfers from the last 30 days. |
Funding transfer columns:
| Column | Definition |
|---|---|
| ID and Trace ID | Reference numbers. Hover and click Click to copy. |
| Created on | When the transfer was created. Click the header to sort. |
| Amount | The transfer amount. |
| Deposit type | Credit or Debit. |
| Level | The transfer level reported by the processor. |
| State | The transfer state, for example Succeeded. |
| Payment instrument | The destination of the transfer. |
Entries tab. It lists every entry in the settlement. More rows load as you scroll.
| Column | Definition |
|---|---|
| ID and Trace ID | Reference numbers. Hover and click Click to copy. |
| Created on | When the entry was created. Click the header to sort. |
| Amount | The entry amount. |
| Transaction type | The kind of entry, as the processor reports it. |
| Fee type | The kind of fee. - when the entry is not a fee. |
| Buyer name | The buyer. - when there isn’t one. |
On the Entries tab, a download button exports the entries to Excel.
Disputes
Section titled “Disputes”Open Payments → Disputes. The list shows each dispute with its amount, the buyer, the reason, the card and the Respond Within deadline.
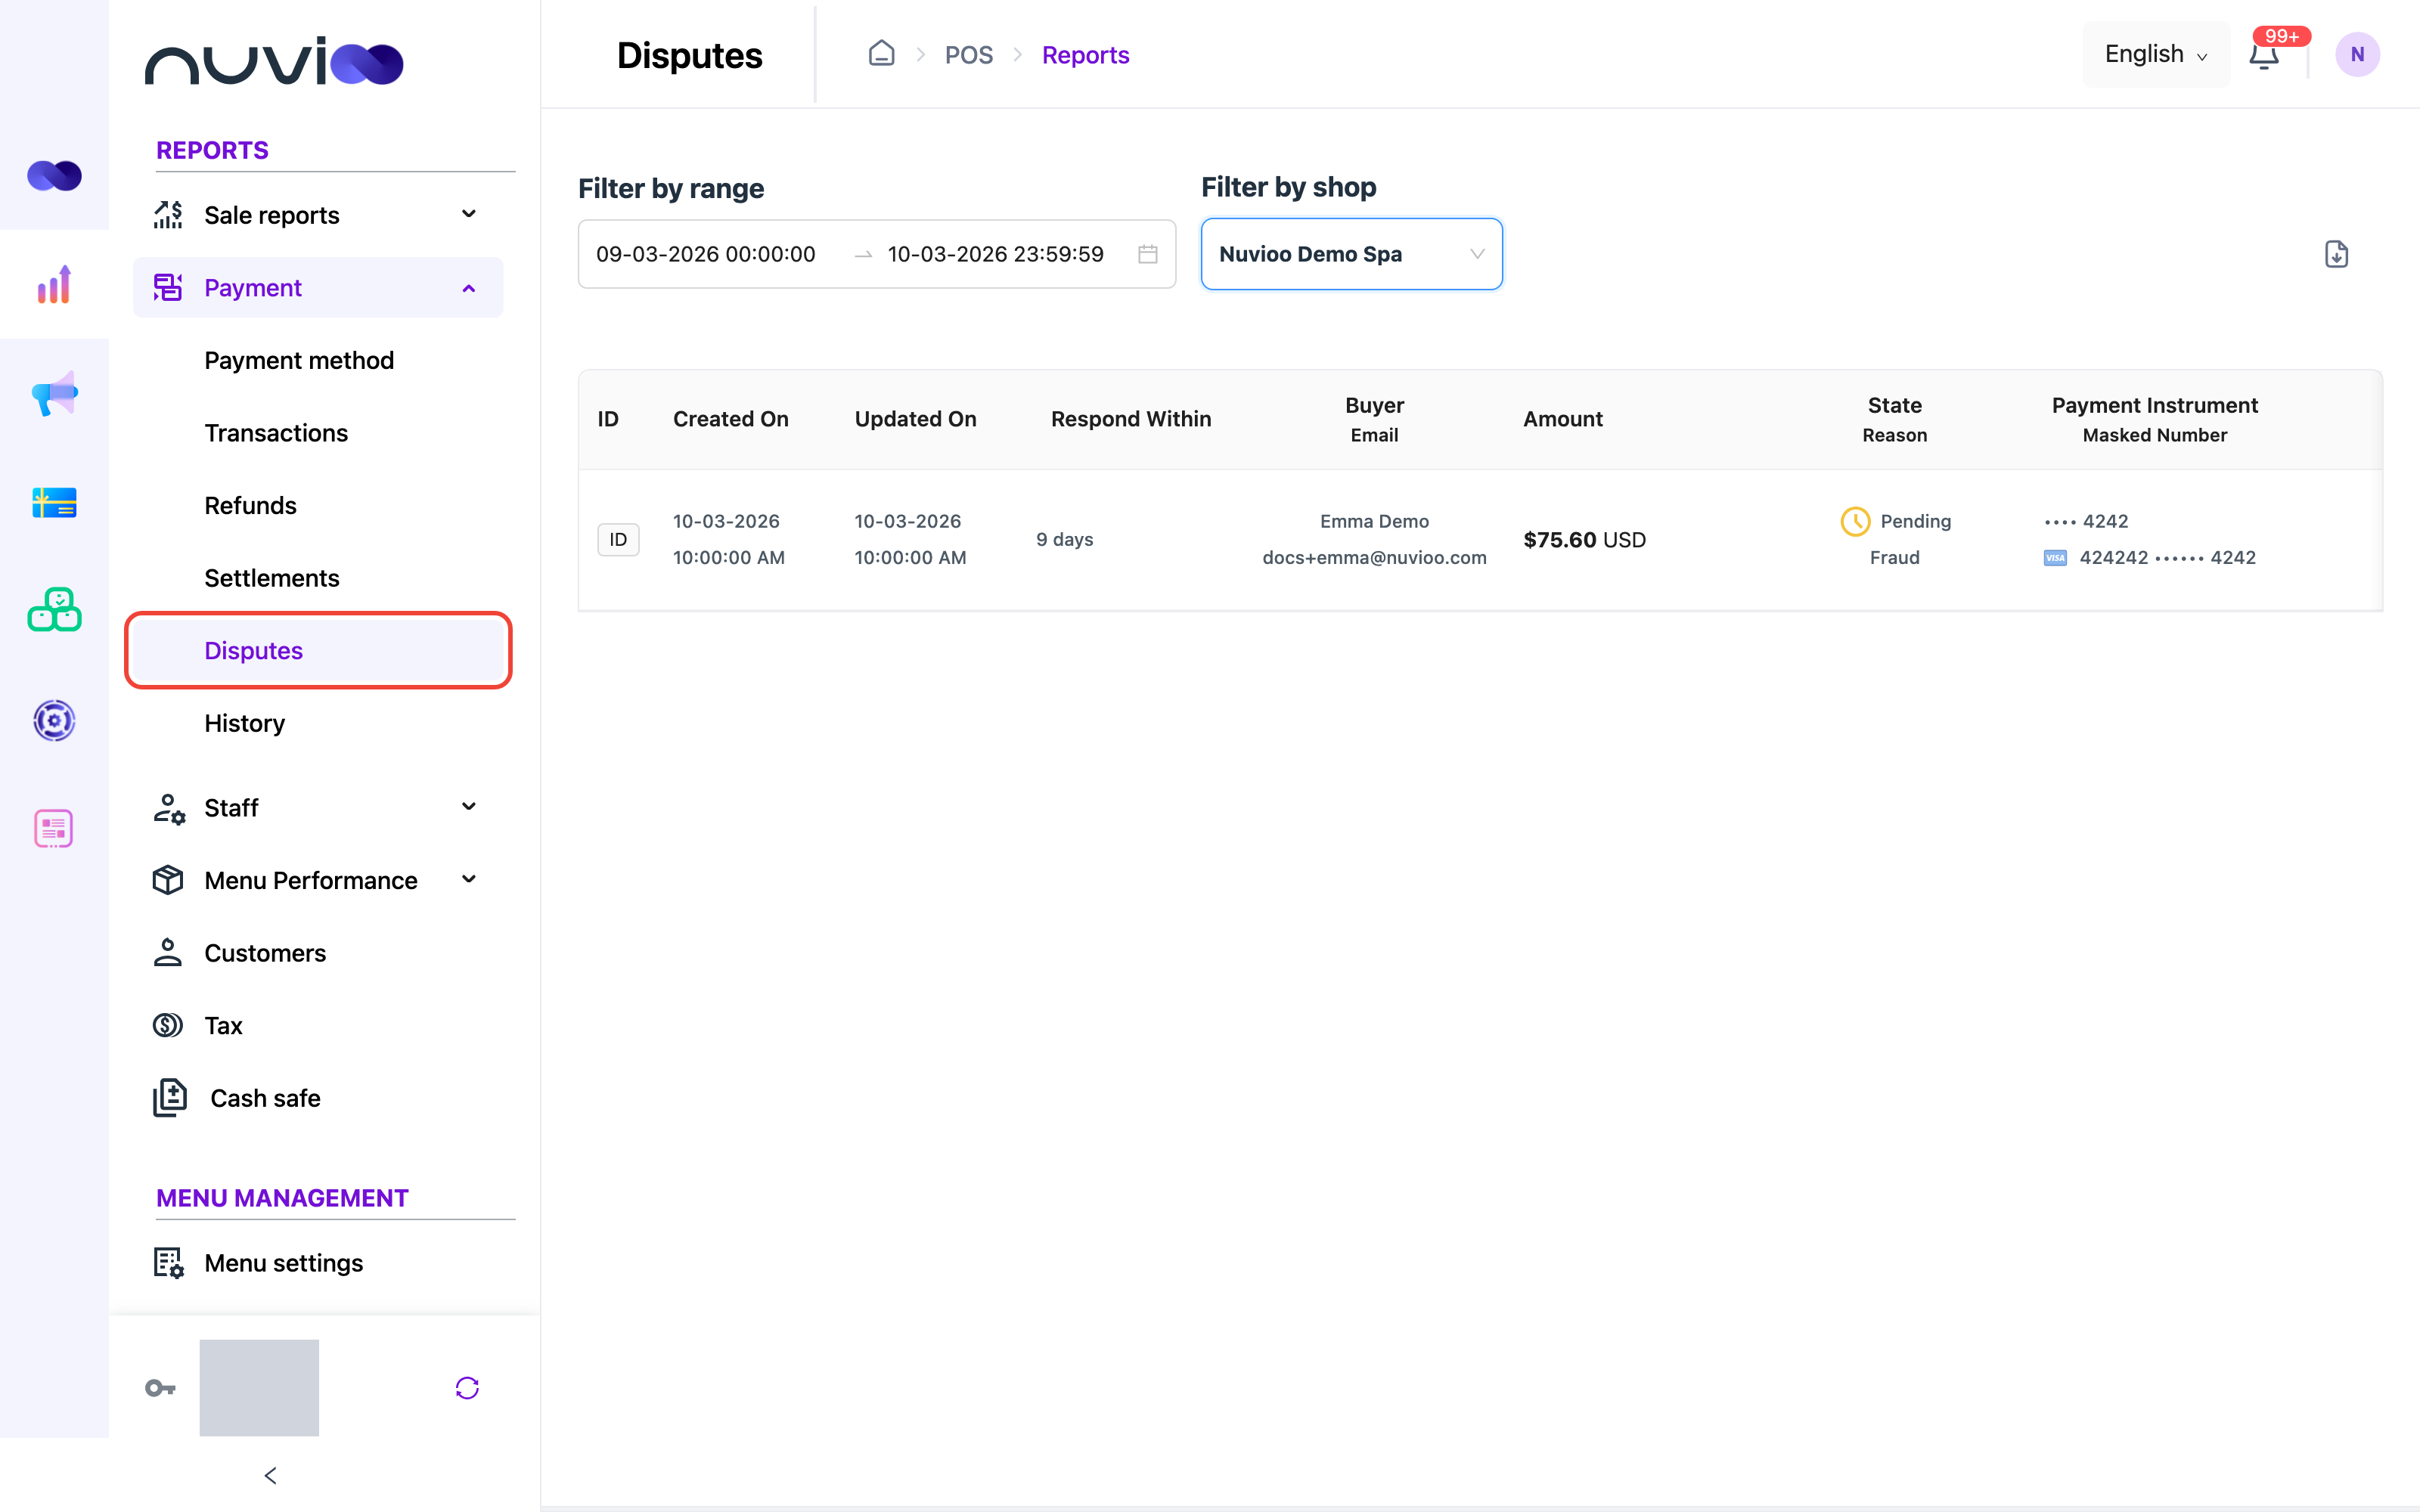
| Filter | Default | What it does |
|---|---|---|
| Filter by range | The last month, up to today. | Matches the date the dispute was created. |
| Filter by shop | See the link on top. | Chooses the location. |
| Column | Definition |
|---|---|
| ID | The dispute’s ID. Hover and click Click to copy. |
| Created On | When the dispute was opened. |
| Updated On | When the dispute last changed. |
| Respond Within | The time left to respond. See below. |
| Buyer | The cardholder’s name, with their email below. |
| Amount | The disputed amount. |
| State | The dispute’s state, as the processor reports it, with the reason below. A pending dispute shows a small icon beside its state. |
| Payment Instrument | The card’s masked number, with the card brand, the BIN and the last 4 digits below. |
| Instrument Type | The instrument type, with the brand and card type below. |
Respond Within works like this.
| What you see | What it means |
|---|---|
| A number of days, for example 3 days | You still need to respond. A timer icon appears when fewer than 7 days remain. |
| Expired | The deadline has passed. |
- |
You already responded, or no response is needed. |
Click the i button at the end of a row to open the dispute. The list loads 10 disputes at a time as you scroll. The download button exports an Excel file. This screen has no print button.
Dispute details
Section titled “Dispute details”The dispute page has a Back link to the list. It has these sections.
| Section | What it shows |
|---|---|
| Header | The Disputes ID, the amount, STATE, RESPOND BY, CREATED ON and ORIGINAL PAYMENT. |
| Response | The response state, the reason code and reason, the processor’s message, and Action Required when the processor asks for something. While you can still respond, Respond Within shows the days left. |
| Dispute Details | Respond By, Last Updated and Processor. |
| Original Payment | Amount, Fees, State, Created On, Type and Statement Descriptor, with the payment’s ID and Trace ID. |
| Buyer Details | Name, Business Name, Email, Phone and Billing Address. |
| Payment Instrument | The card’s brand, type, masked number, expiration date, CVV Verification, Address Verification and Issuer Country. |
| Adjustments | The money movements the dispute caused: Created On, Ready to settle, Amount, Adjustment Type, Level and State. |
| Order Detail | The order behind the payment: order number, Grand Total, Tax Amount, Tip Amount, Total Refund, the order type, the table and the Order Items. |
A section is missing when the processor doesn’t return that information.
Response states
Section titled “Response states”| State | What it means | What you can do |
|---|---|---|
| Needs Response | The dispute is open and waiting for you. | Submit evidence or accept liability. |
| Evidence Submitted | You sent your evidence to the processor. | Download the submitted files. |
| Liability Accepted | You agreed with the customer’s claim. | Download the uploaded files. |
If the processor reports another response state, the page still reads Needs Response. The upload, submit and accept controls are hidden.
Respond to a dispute
Section titled “Respond to a dispute”You have two choices.
Use this when you can show the charge was valid.
Upload your files
Under Submit evidence for this dispute, drag files into the box or click click here to upload. You can upload up to 8 files in total. Each file can be a JPG or a PDF, up to 1 MB. Files start uploading as soon as you choose them.
Check the files
The table lists each file with its ID, File Name, File Status, File Type and Upload On. Click a File Name to download it.
Add a summary
Click Add Details and Submit. The button appears once at least one file is uploaded. In Summary of Evidence for Issuer (recommended), write a short explanation for the card issuer.
Submit
Click Submit Evidence. You see Evidence submitted successfully. The page then reads Evidence Submitted.
Use this when you don’t want to defend the dispute.
Start
At the bottom of the response box, click Accept Liability.
Confirm
In the Accept Liability window, add a Note if you want, and tick I understand that this decision means the merchant acknowledges and agrees to the buyer’s claim.
Finish
Click Accepting Liability. It stays off until you tick the box. You see Accept liability success. The page then reads Liability Accepted.
The Note box and the evidence summary are the same field. Text you typed in one shows in the other. Clear it if you don’t want it sent.
Both actions use the same permission as viewing reports. Anyone who can open Disputes can respond. If a step fails, you see Failed to submit evidence or Accept liability failed, and the page doesn’t change.
Hover over the information icon next to Submit evidence for this dispute or next to Accept Liability to read what each choice means.